Most of this site deals with the technical aspects of Mazes. However Mazes
have a human side to them as well. Making a difficult Maze is more than just
making the Maze large in size (although that certainly helps. :-) Here are
other things that increase the difficulty of a Maze:
- Size Ratio: For Mazes of the same cell volume, a Maze with more
compact dimensions of a more equal ratio can be harder, because there's a wider
area to potentially get lost in. For example, a 25x40 Maze (1000 cells total)
will tend to be harder than a thin 4x250 Maze (also 1000 cells). For this
reason, 3D Mazes are usually much harder than 2D Mazes of the same volume, e.g.
a 10x10x10 Maze (1000 cells again) should be harder than the 25x40 Maze.
- Solution Count: The more solutions there are to a Maze, the easier
it is. The hardest Mazes usually have a single solution, or all the solutions
are close to each other.
- Solution Length: Often, the longer
the solution path, the harder the Maze. This isn't necessarily true, as
sometimes the hardest and best designed Mazes have a very short solution, but
if you don't know the way you'll most likely wander around through the rest of
the Maze. You can at least say that a long solution path guarantees the person
will spend a certain minimum amount of time in the Maze, even if they're very
lucky. The reverse is true, where having the start right next to the finish
makes for an easy Maze of course.
- Curves: An irregular Maze is harder
to solve than one on a standard grid, especially from inside the passages. It's
easy to keep your sense of direction in a regular Maze, where Mazes with odd
angles or subtle curves can get you turned around.
- Loops: Having passage loops or detached
walls can make a Maze harder, since it's easy for one to know they're on a
wrong path when they hit a dead end, however if they go around in circles they
can visit the same path many times before they know they should be somewhere
else. Note this doesn't contradict the solution count statistic above. Just
have the loops not on the solution path, so they make the Maze harder instead
of easier to solve.
- No Wall Following: When solving a
Maze, be it a life size version or a Maze on paper, people will sometimes just
follow a wall. In the hardest Mazes, this won't work, as you'll just find
yourself back at the start again if you try that. To make a Maze like this,
have the start or finish in the center of the Maze, and have a passage loop
surrounding it. Bridges can be used to disable wall following as well, if a
bridge is on the solution path and a passage loop surrounds one end of the
bridge. Checkpoints can do the same, if a loop surrounds a wall section in
which exists a checkpoint.
- Roundabout Passages: Passages that
seem to go one way, but end up sending you somewhere else, make a Maze harder.
A good example of this is a spiral, where passages spiral into and back out of
its center. In a spiral it's very difficult to see where a passage will lead
you without actually following it.
- Unintuitive Choices: Psychologically, people tend to make choices at
junctions that lead toward the exit. Having passages that seem to lead away
from the exit be the right path can make a Maze harder. Similarly, having the
solution path require you to do sharp hairpin turns at junctions can also make
a Maze harder, because people tend to be reluctant to "undo" what
they just did. Finally, people tend to go right when all other things are
equal, e.g. people more often go counterclockwise through amusement parks,
presumably because most are right handed or drive on the right side of the
road. Having passages that require going left or go clockwise around the Maze
can make it harder.
- Repetition: Recognizable landmarks
can make a Maze easier to solve, as one can use them as a reference point.
Conversely, having different parts of the Maze similar but slightly different
can make a Maze harder, as your memory can confuse you more instead of help
you.
- Enticements: Landmarks such as
bridges, rooms, notes on the wall, and so on, tend to attract a person solving
a Maze, as they want to check out the point of interest. Having the solution
path go within sight of but not past a landmark is a good way to make many
people take the wrong path. A perfect example is one of the plans for Glacier
Maze featured a really long passage which turned a corner, where one could see
a "clue" sign at the corner. You of course wanted to go down the long
passage to read the clue, where once you're there you noticed the long passage
was a dead end right after it turned the corner, where the "clue"
sign helpfully said "This is a dead end". ;-)
- Deviation Distance: Mazes with blind
alleys that deviate a long distance from the solution path make a Maze harder
and more complex, because you can go longer before knowing you're on the wrong
path. Long false paths also make it harder for one to see which way to go when
looking at a map or down on the Maze from above too. Conversely, a Maze with
only small hair like dead ends like a pipe cleaner is easy to navigate, where a
unicursal Labyrinth is the easiest of all because you're never off the solution
path.
- Gender Differences: Although this may not apply to particular
individuals of course, in general men and women approach Mazes differently. Men
tend to think in terms of absolute location, while women look for and remember
landmarks. Hence having or not having landmarks can make the Maze easier or
harder for certain genders.
Just because a Maze is difficult doesn't necessarily mean it's
a good Maze. Sometimes the most fun Mazes are relatively easy, where in fact a
Maze that's too challenging may just cause frustration. Here are some elements
that can increase the fun of a life size Maze. Some of these can also be
applied to Mazes on paper:
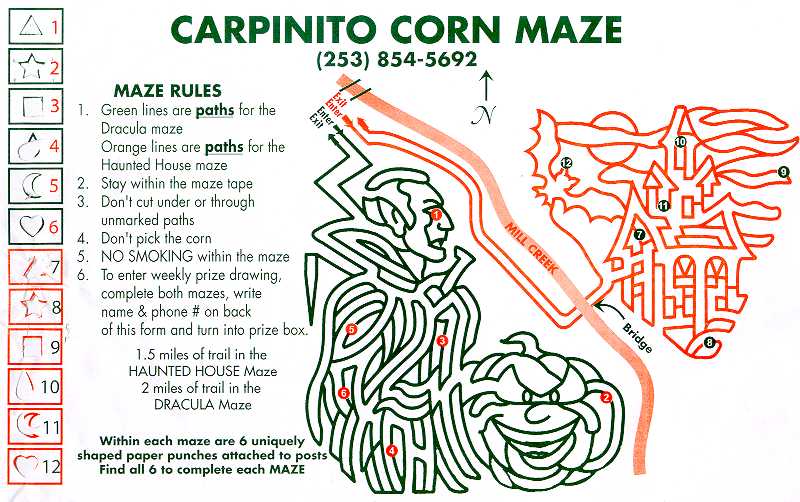
- Emergency Exits: Safety first of course. If someone panics in a
Maze, it's good if they can get out quickly. Fence Mazes tend to have walls
that end a couple feet above the ground, allowing one to crawl out if
necessary. A nice thing about corn Mazes is you can always get out if necessary
by just cutting through the corn.
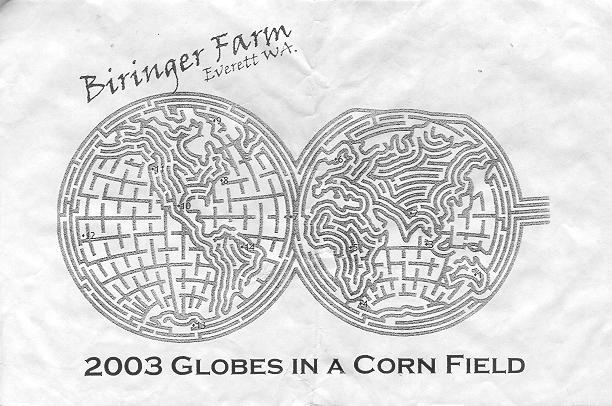
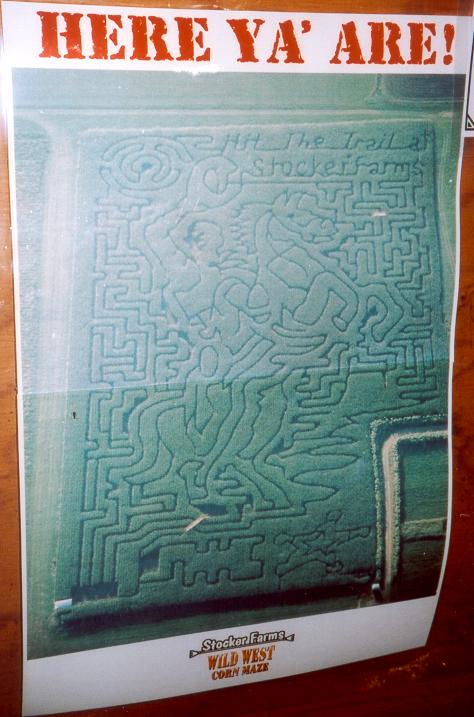
- Shapes: Making a Maze a picture of
something or giving it a theme, makes it a more obvious work of art. It can
also create additional public interest, as opposed to the Maze just being an
abstract puzzle. A Maze can spell out some advertisement in exchange for
sponsorship. A picture or theme can attract the media, where a newspaper or TV
station is more likely to do a story and take an aerial photo of the Maze if it
actually forms an artistic picture. A picture can be appreciated when you're
inside the Maze too, as opposed to only from the air. While going through it,
it's a good exercise to mentally connect the passages where you are to the
picture, e.g. this triangular shaped room is the cow's ear.
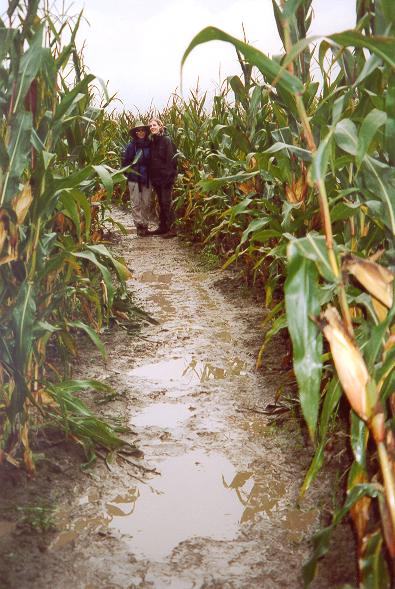
- Ground Cover: It's nice if an
outdoor Maze has the ground covered with bark or gravel. With ordinary dirt
floors the Maze will be a mess after it rains!
- Map: Many life size Mazes give out
maps of the Maze to visitors, or at least have aerial pictures displayed by the
entrance or at locations inside the Maze. People who like a challenge are free
to not look at the map, while people who need the help or need to get out
quickly can use the map. Finding an efficient route on a map and then following
it is a good mental exercise.
- Landmarks: Having points of interest
in the Maze can increase the fun or at least break up the repetitiveness of all
the passages. Landmarks can be checkpoints, bridges, open spaces, signs, and
more. Glacier Maze has, in addition to checkpoints and bridges, funny Far Side
cartoons on various walls, along with "clue" signs at various points
(which may or may not be helpful).
- Bridges: Bridges are nice since they
add a 3D element to the Maze, and are a great place to take overview pictures
of the Maze from. Of course, they're more expensive to construct, since they
need to be sturdy, where they may have a dozen people hanging out on them. I've
seen "poor man's bridges" in life size Mazes before, which are
basically crossroads where a sign says the rule is you have to go straight.
- Checkpoints: Having checkpoints in the
Maze, i.e. things you need to find in the Maze before the exit, can add
interest. Checkpoints break up the monotony, where you can feel like you're
making progress in stages. With a single solution, it's all or nothing, where
there's nothing else to do along the way. With checkpoints, if you're bad at
Mazes or in a hurry you can at least say you found the first few checkpoints.
When there are multiple checkpoints, the user tends to find the first ones
faster, since there are more available when you start. That can engage the
user's interest and make them want to find the rest. Checkpoints don't make a
Maze any easier, as once you've found all but the last checkpoint or two, the
Maze becomes as hard as a normal Maze with only one goal. A Maze of a given
size with checkpoints is harder, since you need to cross the Maze several times
in order to find them all. Sometimes checkpoints can also be landmarks, e.g.
Glacier Maze has four checkpoints in towers at the four corners, where those
towers can be seen looming over the walls.
- Ordered Checkpoints: Checkpoints in
a Maze can also be ordered, meaning you have to visit them in a particular
order. This basically makes the Maze a sequence of Mazes within the same
passages, where this challenges a smart person to use their memory to more
quickly navigate the paths. For example assume you've found checkpoint #1,
however along the way you passed checkpoints #2 and #4. Can you remember the
way back to them?
- Separate Mazes: Instead of having
just one big Maze in the available space, you can have a few Mazes. For example
have a hard Maze for people that like a challenge, and an easier Maze for
children or people with less time.
- Loops: Loops in a Maze can be good
since they help avoid traffic jams. People won't get bunched up in dead ends,
since you can always move forward, or leave any location by two paths.
Carpinito Brothers corn Mazes tend to have their checkpoints on cul-de-sacs,
since checkpoints often have a group of people hovering around them. I once did
a life size tarp Maze which was "braid", i.e. had no dead ends at
all.
- Changing Solution: Finally, if your
Maze is permanent (as opposed to existing for just a season like a corn Maze)
you can periodically change the way through. This can attract repeat business
from locals or people who have done it before. Glacier Maze changes the plan of
their fence Maze about once a month, where they post the shortest time someone
has managed to solve each plan, as a record to try to beat.
So you've entered life size Maze! Here are a few tricks on how
to effectively solve one:
- Restroom: First and most important, always visit the restroom before
entering a life size Maze! You may be in it a lot longer than you expect. ;-)
- Equipment: Bringing items inside the
Maze can help you solve it. A compass can help if you tend to get turned
around, and can't use the sun or tall landmarks to orient yourself. Corn Mazes,
especially in wet states like Washington, can get very muddy, hence wearing
boots, especially rubber boots, is often a good idea.
- Teamwork: If you're solving a Maze with someone, you can work
together. For example one person tries one way and the other another, where
they can call to each other whether they see a dead end or a continuing
passage. Just don't get too far separated from each other! Even if you're doing
the Maze on your own, you can talk to or just watch other parties in the Maze.
If you see someone go around a corner, then a few seconds later come back, that
passage is probably a dead end.
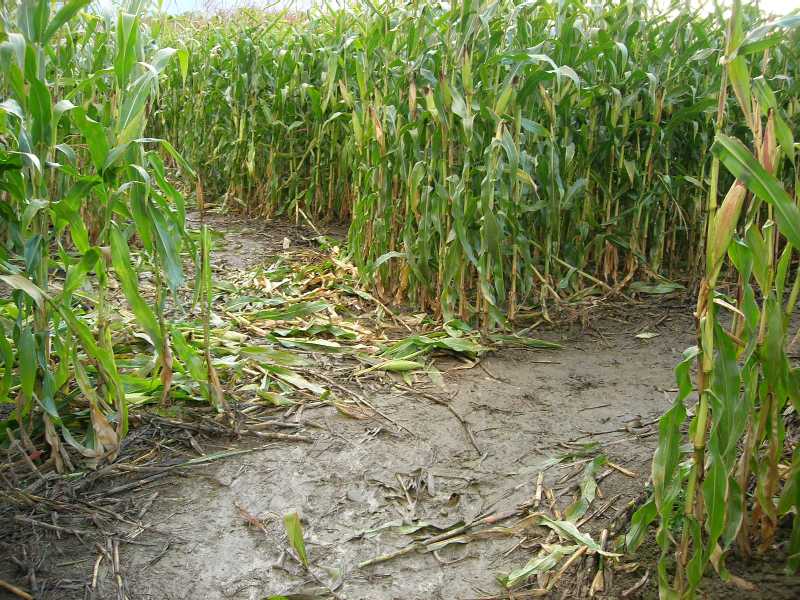
- Look Down: The correct path through a Maze tends to be more worn. In
Mazes with dirt floors such as corn Mazes, at a junction the dirt leading down
the correct path will often be more packed and with less vegetation. In Mazes
with gravel floors, the gravel will often have a deeper path through it.
- Go to the Light: You can sometimes
tell a passage will be a dead end before you see the block at the end, because
the passage will get darker, due to visible shadows or the block cell being
surrounded by walls on three sides. This most often can work in fence Mazes,
which have solid and narrow walls.
- Speed: Getting through a Maze
quickly often involves just moving as fast as possible (speed walking if the
Maze doesn't allow running). When I broke the record for fastest time through
one of the setups at Glacier Maze, much of that was accomplished by just going
really fast through it, as opposed to being smart. ;-) Solving a Maze quickly
is one thing, while solving correctly making a minimum of errors is a different
skill.
- Full Minute: If you're timed in a life size Maze, by having a card
stamped at the start and end with the current time, and that time is only to
the nearest minute, then initially you should get your card stamped right after
the machine switches to the next minute. That gives you the full first minute
to work on the Maze, as opposed to if your card is stamped right before the
next minute, in which case you've already lost a minute a few seconds after you
start.
- Changed Solution: In corn Mazes,
beware of people carving their own paths through the corn (which can be seen if
a passage is narrower or has fallen corn at its bottom) which can make
following a map more challenging, since it doesn't fully correspond to the
terrain anymore. Hence it's often easier to solve a corn Maze earlier in the
year, before it gets too damaged.
- Go around: This should be considered cheating, but it can be used as
a technicality in getting to the exit of a life size or paper Maze quickly. If
the entrance and exit points are on the outer edge of the Maze, and the
objective is merely to get to the end (as opposed to actually going through the
Maze) then you can reach the end quickly by simply going around the outside of
the Maze! ;-)
- Couple's Test: A life size Maze is
a good test for any potential couple! If you and your date can go through the
Maze together, and not get angry at each other when you get lost, while you
share the decision making, count on happy times together. :-) On the other
hand, if your date acts like an angry car driver with "road rage" or
insists on making all the decisions where you go, expect them to behave the
same way in a relationship.
Here's a way to simply describe the solution path to a Maze. This notation I
use is based on standard characters, meaning it can be easily sent to others
through e-mail, shouted to others verbally, or even sent to a person via a
mobile device. (The last two are good if one person is lost inside a Maze, and
a person looking down on them from above or who knows it by heart, wants to
tell them the fastest way to get to the exit.)
- Letters: In my notation, simply use "L" to indicate one
should take the first path on the left at a junction, and "R" to
indicate the first path on the right. Use "A" to indicate one should
go across i.e. take the middle path when at a crossroads. For example, for the
traditional plan of the Hampton Court hedge Maze, the way through is simply:
"LRRLLLL". For more complicated Mazes that can have five or more
passages meeting at a point, use the letters that come after "L" and
"R" to indicate the next passage on the left or right. In other words
use "M" to mean one should take the second passage from the left,
"S" to indicate the second passage from the right, "T" to
indicate the third passage from the right, and so on. In all cases if there are
an odd number of choices and you want to indicate taking middle one, use
"A". Additional letters can be used to describe 3D Mazes, e.g.
"U" means to go up, and "D" means to go down. Note
"L" really means take the first available passage from the left, even
if it turns you to the right, e.g. if a junction has you take either a slight
turn to the right or a sharp turn to the right, the slight turn is still
indicated by "L" since it's the leftmost.
- Repetition: Numbers can be used to indicate taking a particular
direction more than once, e.g. "L4" means take the first left four
times in a row. The way through the Hampton Court Maze can be better expressed
as: "LR2L4". Parentheses can also be used to mark off a subset of
instructions, to be repeated a number of times. For example, with my secret pattern Maze that you can get through by
going "left right right", "left right right" over and over,
its solution is "(LRR)71R" or "(LR2)71R" which means go
"left, right, right" (do that 71 times) followed by one more right to
reach the center.
- Reverse: This notation is readily reversible, to navigate from the
end back to start. Simply follow the instructions from right to left instead of
left to right, and invert the "leftness" and "rightness" of
all the letters. In other words, exchange L's and R's, M's and S's, and leave
A's alone. The way back out of the Hampton Court Maze is "R4L2R",
while the reverse of the secret pattern Maze above is "L(L2R)71".
- Absolute: Note indicators like "L" and "R" are
relative to the direction you're currently going, which is the easiest to apply
when you're inside a Maze. Additional letters can indicate absolute motion,
e.g. "N" means to go North, "W" means to go west, and so
on, which can be easier to apply when looking down on a Maze from above.
There are a number of mathematical formulas that apply to things in Mazes.
Formulas involve variables which represent the number of things in a Maze.
First, below are defined several primitive variables for some simple things
found in Mazes:
- d = Dead Ends: This is the number of dead ends in the Maze in
question.
- j = Junctions: This is the number of simple junctions, where exactly
three passages meet in a cell.
- c = Crossroads: This is the number of crossroads, where exactly four
passages meet in a cell. For non-rectangular Mazes where more than four
passages can meet, have an array of numbers for all types of general junctions,
based on how many passages can meet in a cell.
- e = Entrances / Exits: This is the number of entrances and exits,
i.e. openings in a boundary wall.
- l = Loops: This is the number of
passage loops or detached walls within the Maze.
- i = Isolations: This is the number
of isolated inaccessible areas, i.e. collections of passages unreachable from
entrances.
- x & y = Horizontal & Vertical Passages: This is the number
of passages across and down in a standard rectangular Maze.
Now here are more advanced variables for things in Mazes, which can be
calculated if you know the values of certain primitive variables above, or
other advanced variables:
- b = Branches: This is the total number of choices throughout the
Maze. For rectangular Mazes: b = j + 2c. In general, for each
cell increment b by (the number of passages coming together - 2).
- t = Terminations: This is the number of places where you can only go
in one direction, i.e. a dead end or an entrance or exit. By definition: t
= d + e. For perfect Mazes: t = b + 2. Why is that?
Picture a perfect Maze growing like a tree, where you start with a single
unbranching passage segment, where t = 2 there for its two ends. Each time you
add a branch, that results in a new passage attached to the tree that has a new
termination on its far end.
- v = Valence: This is a measure of the "density" of a Maze,
i.e. how many wall segments are within it based on what a perfect Maze would
have. By definition: v = i - l. Each isolation adds one to this
value, while each loop subtracts one. For perfect Mazes, v = 0 of course,
although a Maze where v = 0 isn't necessarily perfect (it just means the Maze
has an equal number of isolations and loops). For all Mazes: v = (t - b -
2) / 2. Why is that? Solving for t results in a generalized version of
the equation above: t = b + 2 + 2v. Each loop subtracts two from
the termination count, since it in effect connects two dead ends with each
other, while each isolation adds two to the termination count, since it in
effect spawns a separate Maze with its initial passage with two terminations.
- n = Nodes: This is the total number of points of interest within a
Maze. Nodes are either junctions, dead ends, or entrances. By definition: n
= j + c + t.
- p = Passages: This is the total number of passages between nodes.
For all Mazes: p = (3j + 4c + t) / 2. Why is that? Each junction
is one end of three passages, each crossroads is one end of four passages, and
each termination is the end of one passage. That accounts for both ends of each
passage, so just divide by two. Another formula for passage count can be found
by plugging in the value for t above and simplifying: p = 2j + 3c + v + 1.
The way to think of this one, is you start with one passage, where each
junction appends two passages to the tree, and each crossroads appends three
passages. Loops connect two passages together, decreasing the count by one, and
isolations spawn a new passage, increasing by one.
- w = Wall Segments: This is the number of individual wall segments.
Any two cells adjacent to each other (the area outside the Maze can be
considered a giant cell for this purpose) have a potential wall segment between
them. For rectangular Mazes: w = (x+1)*(y+1) - e + v. Note this
means if you count the number of wall segments in a Maze, i.e. know w, then you
can determine its valence without the complicated process of counting loops and
isolations, by solving for v: v = w - ((x+1)*(y+1)) + e.
- o = On Pixels: This is the number of set pixels, in a bitmap picture
of a Maze. Assuming walls are one pixel thick of "on" pixels, and
passages are one pixel thick of "off" pixels, then for rectangular
Mazes: o = (x+1)*(y+1)*2 - e + v. This is basically the same
equation above, except that it takes two on pixels to form a wall segment. As
above, if you count the number of on pixels in rectangular Maze, i.e. know o,
then you can determine its valence: v = o - ((x+1)*(y+1)*2) + e.
This site produced by Walter D.
Pullen (see Astrolog homepage), hosted on astrolog.org and Magitech, created using Microsoft FrontPage, page last updated
November 1, 2014.